將wiki知識庫添加到現有WordPress站點甚至創建專用wiki站點的另一種方法是使用代碼段方法。
缺點是你必須複製/粘貼一些對初學者來說可怕的代碼。好處是它給你更多的自由,而且與前兩個選項不同,它是完全免費的。
我們會儘力提供分步說明。
注意:在開始之前,請創建WordPress站點的完整備份。
您需要做的第一件事是安裝並激活Knowledgebase CPT插件。這個簡單的插件創建了一個名為的自定義帖子類型knowledge_base和一個名為的分類section。
這使您可以輕鬆添加Wiki文章並將其組織成各個部分。
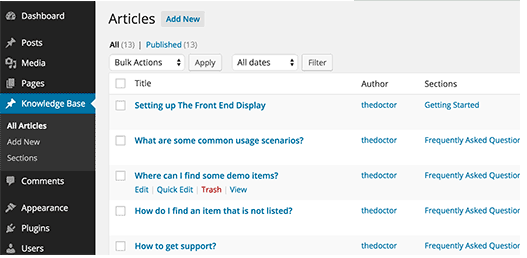
一旦你有一些文章和部分,你需要在你的網站上顯示它們。這是您需要處理一些代碼的地方。
首先將此代碼段添加到主題的functions.php文件或特定於站點的插件中。
function wpb_knowledgebase() {
// Get Knowledge Base Sections
$kb_sections = get_terms(‘section’,’orderby=name&hide_empty=0′);
// For each knowledge base section
foreach ($kb_sections as $section) :
$return .= ‘<div class=”kb_section”>’;
// Display Section Name
$return .= ‘<h4 class=”kb-section-name”><a href=”‘. get_term_link( $section ) .'” title=”‘. $section->name .'” >’. $section->name .'</a></h4><ul class=”kb-articles-list”>’;

// Fetch posts in the section
$kb_args = array(
‘post_type’ => ‘knowledge_base’,
‘posts_per_page’=>-1,
‘tax_query’ => array(
array(
‘taxonomy’ => ‘section’,
‘terms’    => $section,
)       ,
),
);

$the_query = new WP_Query( $kb_args );
if ( $the_query->have_posts() ) :
while ( $the_query->have_posts() ) : $the_query->the_post();
$return .=  ‘<li class=”kb-article-name”>’;
$return .=  ‘<a href=”‘. get_permalink( $the_post->ID ) .'” rel=”bookmark” title=”‘. get_the_title( $the_post->ID ) .'”>’. get_the_title( $the_post->ID ) .'</a>’;
$return .=  ‘</li>’;
endwhile;
wp_reset_postdata();
else :
$return .= ‘<p>No Articles Found</p>’;
endif;
$return .=  ‘</ul></div>’;
endforeach;
return $return;
}
// Create shortcode
add_shortcode(‘knowledgebase’, ‘wpb_knowledgebase’);
此代碼列出了它們所在的部分下的所有知識庫文章。
接下來,您需要做的就是創建一個新的WordPress頁面並[knowledgebase]在其中添加短代碼。保存您的頁面並進行預覽。
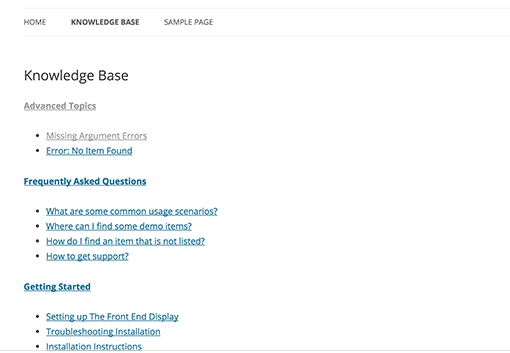
它現在看起來非常簡單,但我們可以添加一些樣式。您可以使用此CSS作為起點,然後繼續編輯以匹配您自己的顏色。
將以下代碼粘貼到主題的style.css文件中。
.kb_section {
float: left;
width: 280px;
max-width: 280px;
margin: 10px;
background-color: #f5f5f5;
border: 1px solid #eee;
}
h4.kb-section-name {
background-color: #eee;
margin: 0;
padding: 5px;
}
ul.kb-section-list {
list-style-type: none;
list-style: none;
display: inline;
}
li.kb-section-name {
list-style-type: none;
display: inline;
}
ul.kb-article-list {
list-style-type: none;
list-style: none;
}
li.kb-article-name {
list-style-type: none;
}
div.kb_section:nth-of-type(3n+1) {clear:left;}
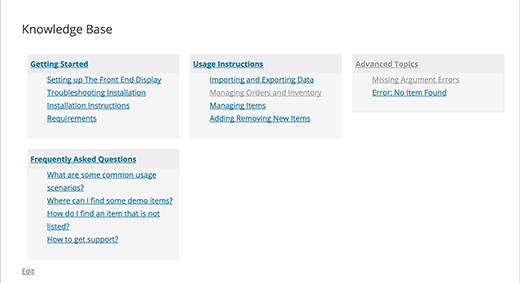
div.kb_section:nth-of-type(3n+3) {}這是我們在我們使用Twenty Twelve主題的演示網站上看到的。
默認情況下,您的部分將按字母順序顯示。但是,如果要更改節的順序,則可以通過安裝Custom Taxonomy Order NE插件來實現。這將允許您按正確的順序拖放您的部分。
這就是全部,我們希望本文能幫助您在WordPress網站上添加Wiki知識庫部分